Pro upscale
Pro upscale, सीखने के लिए कोई setting नहीं।
Agent को बताएँ क्या है — "पुरानी family photo", "anime art", "low-res screenshot" — और agent उसी हिसाब से upscale behavior set कर देता है। न menu, न slider।
4× तक upscale, blur हटाना और चेहरों को sharper बनाना — सब एक chat में। Pro upscale models, smart subject targeting, कोई desktop install नहीं।
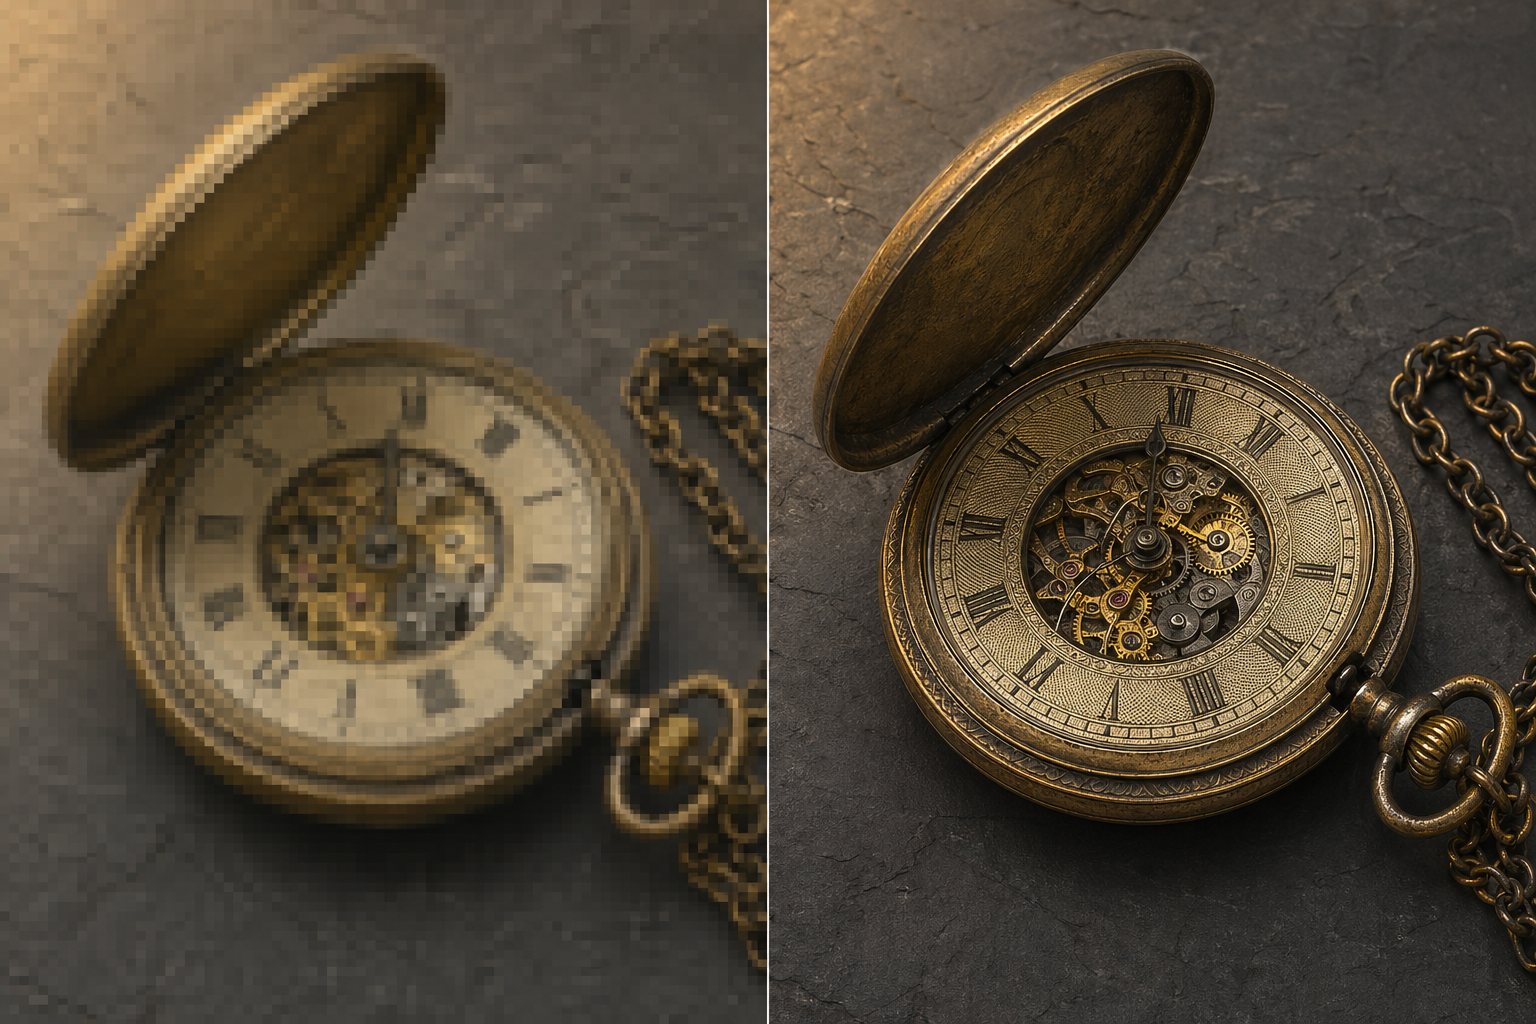
Before / after
अपनी image drop करो, बताओ क्या करना है — agent सही upscale model चुनकर settings लगा देता है। Result कुछ ही seconds में chat में वापस।
Genspark Image Upscaler क्यों
असली upscale models, असली controls, और image agent के बाकी features उसी chat में तैयार।
Agent को बताएँ क्या है — "पुरानी family photo", "anime art", "low-res screenshot" — और agent उसी हिसाब से upscale behavior set कर देता है। न menu, न slider।
जो भी upload करो, बहुत ज़्यादा resolution में वापस मिलता है — print, बड़ी screen, या जहाँ detail चाहिए वहाँ sharp।
Sharper faces माँगो, agent set करता है। ज़्यादा या कम aggressive? बस कह दो। कोई knob नहीं ढूँढना।
बोलो "only foreground" या "keep background detail", agent सही region target करता है। आम भाषा, menu नहीं।
वही agent inpaint, outpaint, background remove और prompt से edit करता है। चार tools के बीच files shuffle करने की ज़रूरत नहीं।
जब input low resolution नहीं बल्कि blur हो, agent deblur और sharpen पर ज़ोर देता है। वही chat, वही controls, वही upscale models।
किसके लिए
किसी भी card पर click करें — agent prompt के साथ खुलेगा।
कैसे काम करता है
Image को chat में drop करें या जो करना है वो लिख दें। Agent दोनों को एक तरह handle करता है।
आपकी description से agent सही upscale model चुनता है और face sharpening, subject focus, detail level एक साथ set कर देता है। अलग intent बोलो, agent adapt कर लेगा।
Upscaled image chat में सीधा दिखती है। Accept करने से पहले original से compare करें।
Type करके tweak करें — "face enhancement और बढ़ाओ", "1:1 में crop करो"। या उसी agent में inpaint, outpaint, background removal में जाएँ।
साथ-साथ
हाँ। हर Genspark account को daily free credit quota मिलता है, जो रोज़मर्रा के upscale के लिए काफ़ी है। ज़्यादा use के लिए Plus और Pro plans monthly काफ़ी ज़्यादा credits देते हैं — एक के बाद एक upscale करते जाओ, गिनती नहीं रखनी पड़ती।
Genspark अंदर industry-standard upscale model call करता है — plus एक faster fallback। Agent description से सही चुन लेता है; कोई model menu click नहीं करना।
Upscale factor 1× से 4×। Output 4K, बड़ी monitor और ज़्यादातर print के लिए काफ़ी high-resolution — exact size आपके input पर निर्भर।
Engine एक ही है। Blur input के लिए "Photo Unblur" label है — model deblur और sharpening की तरफ़ झुकता है, जबकि "Upscale" resolution बढ़ाने पर focus करता है। वही upscale models, वही controls।
हाँ। Agent AI art, anime, illustration पहचानता है और उसके लिए बने mode पर switch कर देता है — clean line work और flat color blocks, photo की तरह painterly smoothing नहीं। बस "anime" या "illustration" बोलो — adapt हो जाता है।
बस describe करो — "sharper eyes, skin natural", "detail मत बनाओ, ये restoration है"। Agent इसे सही setting में translate कर देता है। कोई slider नहीं ढूँढना।
हाँ — यही agent का advantage है। Upscale के बाद उसी chat में watermark हटाने के लिए inpaint, canvas बढ़ाने के लिए outpaint, background remove, या prompt से edit सब कुछ कर सकते हैं। Tools के बीच file shuffling नहीं।
Images आपके project storage में रहती हैं और model training में use नहीं होतीं। आप project — और उसके अंदर सब कुछ — कभी भी delete कर सकते हैं।